
It's Time to get Corny with Fancy Corn On the Cob Holders!

I have seen these fancyfied Corn Holders all over Pinterest. ... Okay 2 or 3 places, that counts as all over the place right? And I wondered how hard it would be to make one.
Here are my step by step instructions so you can make one too.

Materials you will Need
1) Rubber animal or dinosaur. It needs to be able to stand on it's own, 4 feet/paws are required. Also it cant' be a hard plastic figure it needs to be a rubber one that is still flexible and solid all the way through. I picked mine up at a yard-sale for 25 cents... My friend Viv recommends a dog for those of you who like corn-dogs.
2) Hacksaw. To cut it in half.
3) 2 standard corn on the cob holders. You know the kind that everyone sells super cheep that look like corn. You might have some at home, I did and just used 2 of those.
4) A drill with a large drill bit. I used a 1/4 inch drill bit, but if your corn on the cob holders are a different size you will need to adjust for that.
5) Glue. I recommend E6000, but 2 part epoxy would also work. It needs to be strong enough to withstand getting yanked on offend (when your removing the holders from the corpses of your defeated foe... you know the corn)
6) Pen. I used a Sharpie because it will wright on almost anything, but what ever is at hand will work.
7) Foam Sanding Block.
Optional Materials
1) A piece of Ribbon. I'll explain later, but it will make your life easier
2). Paint. This is not necessary you might like your animal tout naturel. Since I got mine at a yard-sale it had been loved and needed a paint job. You can use a variety of paints.
3) Polyurethane. If you use wall paint (love those samples) or craft paint you will also need to Polyurethane your piece.
4) Paint Brush. If you paint you'll need a few brushes, use what makes you happy.
Now that you have your materials Lets Get Started.
1) Clean your animal. Soap and water is fine. I'm going to refer to the animal as a Tiger from here on out.

2) Tie a ribbon around the center of the Tiger. You could use a measuring tape and make dots then connect them, but with an oddly shaped item like this it's so much easier to tie a ribbon around it and use that as your guide.

3) Draw your cut line. Just use the ribbon as a guide for were to draw your line. so easy this way.

4) Cut your Tiger in half. Ooh it's the saw the lady in half magic trick... done badly. Okay maybe not. Use your hacksaw and just follow your line. It dose not requite any real pressure to cut the rubber in half. Just be very careful to stay strait on your line. I had to stop part way though (family can really cut into crafting time) so you'll notice a stop/start line. Oh well no worrys.

5) Sand the inside. Your just trying to get the fuss off so you don't need to go crazy a simple foam sanding block will work just fine.

6) Make a mark in the center. This is were you will drill your hole for the prongs. You could measure it out carefully if you want to, I just eyeballed it. Either way is fine, but you will want a guide dot since It's hard to get an accurate reading when you have the drill in your hand.

7) Drill your hole. You will want a hole that is just smaller than your corn holders so it's a tight fit. Take this step slowly. For safety reasons you should put your Tiger in a clamp so you don't drill your hand. I'm an adult so I chose to take the risk and held my tiger by hand, I don't recommend this approach, but if your all grown up just make the best decision for you. If your are not yet legal or you are not used to using a drill then you definitely will need to use a clamp. Tips for drilling: Don't just try to make your hole all in one go. Drill down just a little bit then pull the drill out, repeat this until you have your desired depth. I recommend about 1/4 inch deeper than your corn holders. You do this for several reasons. 1) So you don't damage the motor of your drill by forcing it. 2) So you don't melt the rubber, that would just make a huge mess. 3) So you can more accurately gauge how deep your hole is and if it's going in strait. If you drill sideways or clear through the tiger then you will need to patch it or start all over, both are just a pain in the behind.
8) Paint your Tiger. This is an optional step. If you want to paint it you will need to make sure that the paint you use is food safe and that your tiger is completely dry before using. Most paint you will need to add a coat or 3 of polyurethane. I use the same kind of polyurethane that is used for floors and furniture. This means that you cant' cook with the item, have wet foods served in it, or put it though the dishwasher, but since they are corn holders you would not be doing any of this so it's not a big deal... or you can play it safe and just not paint it. Also it will take 30 days for the polyurethane to completely cure/dry. I would recommend waiting the full 30 days before use just to be on the safe side. I however used a spray paint, because I'm lazy and like instant gratification... plus I got the can on sale for only $2.50, what can I say I'm also cheep. The spray paint I used is a specialty enamel that is used for engines. It's a little tricky to use, but it is gloss, I did not need to prime, and is safe to use after only 21 days. I used less than 1/2 of the can so I could have made a matching pair, if I had found another rubber animal at the yard sales. You'll notice in the picture below that I did not put paint on the part of the tiger that will be touching the food.
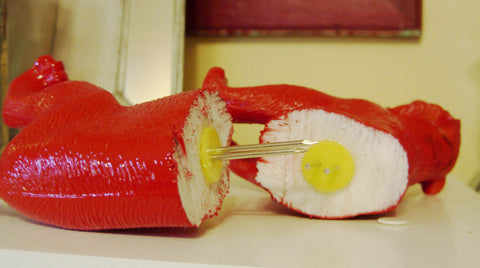
9) Glue in your Prongs. Okay you where not impatient and waited til your tiger was safe to tough after painting it or you thought to heck with paint I like it just the way it is. Now it's time to glue in your old boring corn holders to create your prongs. I use E6000, but you could use 2 part epoxy if you want. Put just a dab on the end of your corn holders, more than a dab and you will end up with a big mess when the excess is pushed out the end. Line your corn holders up into the hole and push them in. Be careful the prongs are sharp. I recommend just getting them started by hand then using a scrap piece of wood and holding the body of the tiger not the holders. Push the corn holders full into the holes. You want this to be a tight fit so your holders don't get pulled out when you are removing them from the corn. Once the holders are in place wipe off the excess glue that has spilled out around the edges and let them dry fully. E6000 takes between 24-72 hours to fully dry, I always give it the full 3 days just to be safe. If you use something else just follow the instructions.
TADA! You Now Have a Super Fancy Set of Corn on the Cob Holders.

Okay I admit it this last picture I made up so it would be easy to Pin onto Pinterest or Post onto Facebook,
This project not including drying time took me about 3 hours and around $3.00 to make, yea! yard-sales.


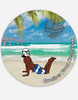

How fun! I could make a whole safari for my next cookout!