by Amy Konecny
on August 10, 2015
with 0 comments
Playing with Cement is so much fun!
I love using Cement for craft projects. It's versatile, cheep, and best of all easy. In fact it's so easy you'll wonder why you have not given it a try until now.
Today I'm going to show you how to make these cool tea-light holders.

Materials


1) Portland Cement: There are quite a few differences between cement and concrete. If you want to know them all I would take a visit to Americas Cement Manufacturers Associations website. However the big point you need to know for doing this project is that it dose not have rocks in it. Also the bags come in 42 pounds and 94 pounds so you will want help moving them. Don't hurt yourself.
2) A disposable container to mix the cement in. I have two types shown in the picture above. The clear plastic container can be reused. These are for smaller batches if you want to make a larger batch a larger container will be necessary. I got mine at a yard sale for 25 cents for the clear one and 60 cents for the 4 paper buckets.
3) Soft plastic or silicone molds, 2 sizes. You can use a hard plastic or metal mold, it's just more work and they might get stuck to the cement so you'll have to brake it to release it. The Larger size is for the main shape and the smaller is to make the well the candle sits in. I used some things I picked up at the Dollar Tree.
4) Something to stir with. I am using a paint stick I picked up at my local hardware store, but you can use just about anything even you hands. If you choose to use your hands please ware gloves. It's not because cement is toxic or anything like that, but it will suck the moisture out of your hands and leave them a total mess. I learned this one the hard way.
5) Sand Paper. I used 100 grit sand paper. I found a container of 20 sheets at the Dollar Tree. These will be used up so no need to use the expensive kind.
6) Water. You'll be adding this to the mix to make the Cement, in the sanding process, and for washing up.
7) Paint and Polyurethane. This last one is optional. You might want to leave it natural or you might want to paint the whole thing.
Once you have gathered all your ingredients it's time to begin.
1) Mix The Cement. Mixing cement is a lot like mixing cake batter, I know this is only helpful if you bake. Let me explain in detail. First put water in to your mixing bowl, quarter full or less. Then slowly mix in the cement till you get the consistency you want. This means put a little bit in and stir then put in a little bit more and stir some more... repeat till your happy with the result. Do Not just dump a large amount of cement into the bowl unless you want to make a large mess. You will end up with some parts well mixed, some parts still dry, part that is still mostly water, and splatters all over the place. Well that could be fun to, but not productive.
A couple of things you need to know when mixing cement. Portland Cement dose not dry it cures so it can be completely covered in water and still harden. So once you start with this project work until you are done. The other thing to know is the more water to cement you have the weaker your end product will be so make it as thick as you can for what you are working on.
This is what a thin, but still usable mix will look like. It's about as thick as cake batter. It pours smoothly and flattens out immediately.

This is a thick mix, it has the consistency of thick brownie mix. It will pour well, but you will need to use the scraper or spoon to help it along. In baking terms it would be a the soft picks stage. (It can actually be made thicker than this, but it becomes difficult to use for small projects)

2) Pour the Cement into your mold. Don't fill the mold completely you need to leave expansion room for when you put in the second mold (the one that creates the well). Just eyeball it you can always use a spoon to remove excess if you put to much in.
3) Gently Tap your mold on a hard surface for around a minute. You do this for two reasons. The First reason in to make sure the cement completely settles into all the nooks and cranes so you have a smooth and whole piece. The Second reason is removing the air bubbles. Air bubbles unless you have a lot of them will not harm your project, but they can be unsightly. I don't mind a few so I don't try to get rid of all of them, but the smoother you want your surface / sides / bottom to be the more you will want to work on this. If you get any bulges at the top that will not pop just from tapping try blowing on it. This usually works well.
4) Insert the second mold. If like me you are using a much smaller second mold then just push in into the cement until just about a cementer is left sticking out of the cement. At this point mine kept on popping back up so I put some rocks in it to keep that from happening. If you are using a larger second mold just push it in until your happy.
Two things to remember at this time. If the lip of your second mold gets covered in cement then it will make it difficult to remove, you will most likely need to chip away at the cement and possibly brake the mold to remove it, hence leaving a centimeter of space around the top. If you are using a second mold that is close to the same size as the first or close to as deep. Remember that the thinner the thickness of the cement is the less strength it will have. It's fine if you want something delicate looking, just remember that it will be delicate in reality as well. Plus if one area is significantly thinner than the others that will be it's weak spot and ware it will brake.
5) Leave it alone. If it's a small project like this one then you only need to let it dry/cure for a day. I think I only left this one alone for 20 hours.
This is what it looked like the next day. Note: I broke off the handle of a plastic measuring cup because the handle was to long and would have made the bottom of the well not even. However this could lead to harm to you or me if the plastic should hit exposed skin (I wore safety goggles so my eyes where safe) during the removal proses and you or I could later be cut on the sharp edges. If you are under 18 please don't do this. If you are over 18 well your an adult and if you want to risk life and limb that's your choice. Just don't say I did not warn you of the risks.

6) Remove the cement from both molds. Because the large mold was soft plastic I just turned it upside down and it slid right out. However the inside mold was made from hard plastic so I had to use some pliers to put it out. I was impatient (the first one I Attacked after only 12 hours) I cause a small amount of to the piece when removing the small mold, but the other 2 came out just fine (I waited till later that day).

7) Sanding the top. Once it is out of the molds you will need to sand the top. You'll notice it has sharp edges and scaling (more so in the picture of it still in the mold. I started sanding before I remembered to take a picture. To remove the scaling and ruff edges you will need to sand it down. Sanding is easy, but a little messy. To make it less messy get your piece wet (this gets rid of the dust problem, witch is really bad for you). Then just take some sandpaper (I use 100 grit) to it and sand in a circular motion. You will want to rinse it off several times to see how the progress is going. You don't need to use much presser and it will only take a minute or two. I do not recommend using an electric sander. Mostly because there is water involved and water plus electricity could make fore a very hair raising day.

I'm showing this in my kitchen sink because I was taking pictuers, but you really will want to do this outside with your garden hose. The grit that is produced will not be good for your drainage system.
8) Paint and Poly what ever part you want to. Once you are done with the first 7 steps you might deiced that Wow this is perfect the way it is. If that is the case then Yea! your done. However I took it one step further and painted and then polyurethaned the inside of the well because I thought it would look cool. One thing you need to know about painting cement is that it will suck up the paint really fast. This means you will need to do several coats, but they will dry quickly.
Tada! Your Done


You will notice that they all came out different colors. That is because they where all different batches of cement with differing amounts of water. If you make yours all from one batch they will be the same color. Also cement is not technically completely dry/cured for 30 days. Though the only practical difference is the color will change slightly. If you where poring a driveway you could drive on it after only 7 days.


by Amy Konecny
on July 13, 2015
with 1 comments
It's Time to get Corny with Fancy Corn On the Cob Holders!

I have seen these fancyfied Corn Holders all over Pinterest. ... Okay 2 or 3 places, that counts as all over the place right? And I wondered how hard it would be to make one.
Here are my step by step instructions so you can make one too.

Materials you will Need
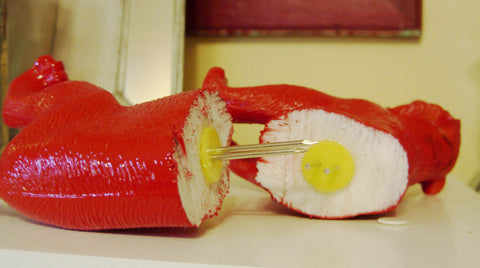
1) Rubber animal or dinosaur. It needs to be able to stand on it's own, 4 feet/paws are required. Also it cant' be a hard plastic figure it needs to be a rubber one that is still flexible and solid all the way through. I picked mine up at a yard-sale for 25 cents... My friend Viv recommends a dog for those of you who like corn-dogs.
2) Hacksaw. To cut it in half.
3) 2 standard corn on the cob holders. You know the kind that everyone sells super cheep that look like corn. You might have some at home, I did and just used 2 of those.
4) A drill with a large drill bit. I used a 1/4 inch drill bit, but if your corn on the cob holders are a different size you will need to adjust for that.
5) Glue. I recommend E6000, but 2 part epoxy would also work. It needs to be strong enough to withstand getting yanked on offend (when your removing the holders from the corpses of your defeated foe... you know the corn)
6) Pen. I used a Sharpie because it will wright on almost anything, but what ever is at hand will work.
7) Foam Sanding Block.
Optional Materials
1) A piece of Ribbon. I'll explain later, but it will make your life easier
2). Paint. This is not necessary you might like your animal tout naturel. Since I got mine at a yard-sale it had been loved and needed a paint job. You can use a variety of paints.
3) Polyurethane. If you use wall paint (love those samples) or craft paint you will also need to Polyurethane your piece.
4) Paint Brush. If you paint you'll need a few brushes, use what makes you happy.
Now that you have your materials Lets Get Started.
1) Clean your animal. Soap and water is fine. I'm going to refer to the animal as a Tiger from here on out.

2) Tie a ribbon around the center of the Tiger. You could use a measuring tape and make dots then connect them, but with an oddly shaped item like this it's so much easier to tie a ribbon around it and use that as your guide.

3) Draw your cut line. Just use the ribbon as a guide for were to draw your line. so easy this way.

4) Cut your Tiger in half. Ooh it's the saw the lady in half magic trick... done badly. Okay maybe not. Use your hacksaw and just follow your line. It dose not requite any real pressure to cut the rubber in half. Just be very careful to stay strait on your line. I had to stop part way though (family can really cut into crafting time) so you'll notice a stop/start line. Oh well no worrys.

5) Sand the inside. Your just trying to get the fuss off so you don't need to go crazy a simple foam sanding block will work just fine.

6) Make a mark in the center. This is were you will drill your hole for the prongs. You could measure it out carefully if you want to, I just eyeballed it. Either way is fine, but you will want a guide dot since It's hard to get an accurate reading when you have the drill in your hand.

7) Drill your hole. You will want a hole that is just smaller than your corn holders so it's a tight fit. Take this step slowly. For safety reasons you should put your Tiger in a clamp so you don't drill your hand. I'm an adult so I chose to take the risk and held my tiger by hand, I don't recommend this approach, but if your all grown up just make the best decision for you. If your are not yet legal or you are not used to using a drill then you definitely will need to use a clamp. Tips for drilling: Don't just try to make your hole all in one go. Drill down just a little bit then pull the drill out, repeat this until you have your desired depth. I recommend about 1/4 inch deeper than your corn holders. You do this for several reasons. 1) So you don't damage the motor of your drill by forcing it. 2) So you don't melt the rubber, that would just make a huge mess. 3) So you can more accurately gauge how deep your hole is and if it's going in strait. If you drill sideways or clear through the tiger then you will need to patch it or start all over, both are just a pain in the behind.
8) Paint your Tiger. This is an optional step. If you want to paint it you will need to make sure that the paint you use is food safe and that your tiger is completely dry before using. Most paint you will need to add a coat or 3 of polyurethane. I use the same kind of polyurethane that is used for floors and furniture. This means that you cant' cook with the item, have wet foods served in it, or put it though the dishwasher, but since they are corn holders you would not be doing any of this so it's not a big deal... or you can play it safe and just not paint it. Also it will take 30 days for the polyurethane to completely cure/dry. I would recommend waiting the full 30 days before use just to be on the safe side. I however used a spray paint, because I'm lazy and like instant gratification... plus I got the can on sale for only $2.50, what can I say I'm also cheep. The spray paint I used is a specialty enamel that is used for engines. It's a little tricky to use, but it is gloss, I did not need to prime, and is safe to use after only 21 days. I used less than 1/2 of the can so I could have made a matching pair, if I had found another rubber animal at the yard sales. You'll notice in the picture below that I did not put paint on the part of the tiger that will be touching the food.
9) Glue in your Prongs. Okay you where not impatient and waited til your tiger was safe to tough after painting it or you thought to heck with paint I like it just the way it is. Now it's time to glue in your old boring corn holders to create your prongs. I use E6000, but you could use 2 part epoxy if you want. Put just a dab on the end of your corn holders, more than a dab and you will end up with a big mess when the excess is pushed out the end. Line your corn holders up into the hole and push them in. Be careful the prongs are sharp. I recommend just getting them started by hand then using a scrap piece of wood and holding the body of the tiger not the holders. Push the corn holders full into the holes. You want this to be a tight fit so your holders don't get pulled out when you are removing them from the corn. Once the holders are in place wipe off the excess glue that has spilled out around the edges and let them dry fully. E6000 takes between 24-72 hours to fully dry, I always give it the full 3 days just to be safe. If you use something else just follow the instructions.
TADA! You Now Have a Super Fancy Set of Corn on the Cob Holders.

Okay I admit it this last picture I made up so it would be easy to Pin onto Pinterest or Post onto Facebook,
This project not including drying time took me about 3 hours and around $3.00 to make, yea! yard-sales.


by Amy Konecny
on July 02, 2015
with 0 comments
Green Dragon, Button

I have to admit that I love dragons, I just think the are to cool. So of course I had to make a dragon button, well actually I have made several of them, but so far this is the only one that I have added to my website. To create the background I used a shimmery green paint for the bottom layer then dropped several successive layers of varying shades of green pant on top to create this spotted dragon egg effect. All in all it turned out pretty cool.


by Amy Konecny
on June 18, 2015
with 0 comments
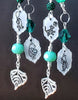
Beautiful Kanji, Earrings

I have been picking up bits and pieces of Kanji (one form of Japaneses writing) for years. I could of course blame my brother for this, as the younger sibling I have had years of practice doing this and it would have the advantage of being partly true, it's a hobby of his. Or I could blame the vast quantity of Anime and Manga I have absorbed (Japaneses entertainment), and this would also be true. Maybe I can fob this off on one of my many friends that took Japaneses in collage, witch sounds cool so it's a fun one to go with. However I'm guessing it's a combination of all 3. For what ever reason I have been making a lot of charms with Kanji on them with English translations (very small) underneath.
This pair of earrings has the Kanji for Beautiful, witch is lovely to look at as just a shape. The English translation is at the bottom. I used one of my favorite colors as the top bead. I was going with the logic of a lovely bead for a lovely word.


by Amy Konecny
on June 04, 2015
with 0 comments
Wish-Ball Button

According to legend you only need 7 dragon eggs to get a wish. Cool! I have no idea what I would wish for, but a wish granted could be awesome. Unlike most of the buttons you will find on my website this one dose not have a copper band around it. This makes for a somewhat thinner button. Orange* and Yellow paint swirls together for the background color while 3 stars float above. I could have put more stars on (in?), but I liked the way 3 looked.
*Note* the paint is a little sparkly witch seamed appropriate to me since the Ball has it's own life. The sparkles help bring the color to life.


by Amy Konecny
on May 18, 2015
with 0 comments
I have been adding new product to the website like crazy this year. Buffing up old beloved lines and adding new. Here are some of the things I have added this past week...


More has been added then the few listed here, but I thought I would give you an overview.


by Amy Konecny
on May 14, 2015
with 0 comments
I have been asked for YEARS "do you make guy Jewelry?" well I now I can say..."sort of". I have been playing with resin for the past month and have decided to use this new found skill to make buttons. Button's are great because unless I cover them in glitter and make them pink they are both guy and girl friendly. Yea! I have something everyone can ware. Now only a few of the buttons will make it onto my website so if you want to see the whole line you'll need to find me or Chance at a Con.
I start out with a few blanks that I have colored and warped in copper...

Then I make up some pictuers to float inside the buttons...

I put just a little resin down to keep the pictuers in place...

Then cover with a thick layer of resin...

After they dry for a day I can add the pin backs then let them dry for several more days. Bellow is one of the batches I have finished with some close up pictuers as well.... well mostly finished I have not added the backs yet.


I'll start adding Buttons to my website next week. Hope you enjoy


by Amy Konecny
on April 27, 2015
with 0 comments
I came across some small glass bottles with plastic stoppers a while ago and of course I had to buy all that I saw because they where just to cute.

They have been sitting around the house for a few years now because I was hung up on the idea that I needed real cork stoppers. I have gotten over that idea; because really plastic stoppers will actually make the bottles air tight plus they work grate for the Zombie Virus (who would stopper a virus with a real cork stopper?), and have made several styles of earrings using the cute little bottles.


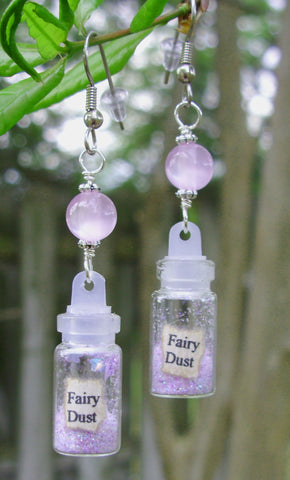
I'm supper happy with how they turned out.
The Zombie Virus Earrings you can buy online the other 3 (Mermaid Scales, Fairy Dust, and Drink Me) at the moment are only available at shows.... if you email me because you "need" one or all 3 of the earrings I can make them available, I'm just being lazy. If you have any ideas for other things to make out of these small bottles I would love to hear them.


by Amy Konecny
on April 02, 2015
with 0 comments
Question 21: You said it takes a really long time to make a picture truly look like the product. Can you show us a before and after?


Answer 21: Sure. Here is a picture of my “Yoga, Pepole Pin” (you can find it above and below since I'm long winded). The picture on the Left is the before... well mostly before it's been cropped. As you can see I use a gray background, I used to use white, but when I took the picture the digital camera would distort the colors of the product to much. The picture on the Right is the after. I cleaned up the background so it was all white, lightened and corrected the colors so it would more accurately represent the true colors of the pin, then I had to re-draw the picture on the charm since the color correction proses faded it out. When you hold the pin in your hand you can see the picture on the charm is a very dark gray, most people would call it black. However after the color correction it's a light gray or almost invisible in some places so I re-draw it in a very dark gray. The only thing I can never get perfect is the charm background since most of them are white, but if I fix it completely then the differences between the charm and the background of the photo is not great enough to tell where one begins and the other ends.


Question 22: This question comes from a customer. "I have allergies to some metals. What are your bracelets metal components made of?"
Answer 22: This is a great question and one anyone that is sensitive should ask. I use a variety of metals copper, pewter, stainless steal, silver, brass, bronze, and some times base metal. I try VERY hard to make sure that all my components are nickle free and lead free. However since I don't have a way of testing the metals myself I have to rely on the company's that I order from to have accurate information. I am very confident that the Ear Wires I use are Surgical Stainless Steal since they are made by a US company. However not all of my components are made in the US and some country's have lax testing standards. I will say that I am sensitive and my assistant Tig (Tig is great she helps out with sales) is crazy sensitive and neither one of us has ever had a problem, and in the 15 years I have been in businesses I have only had to make one return because of sensitivity reasons. Hopefully this means that I'm doing a good job at finding materials that truly are nickle free and lead free.
Q. Wow a straightforward couple of answers. I might just die of shock. (hand held to hart)
A. humph
Question 23: What if the customer is sensitive to your product. Can they return it?
Answer 23: As long as the item is in good shape i.e. it was not chewed on by the dog, run over by a car or played ruffly with by a kid, Sure. I will say that it is my policy to not make returns for people that are mean to me (it's only happened once in 15 years so it's a rarely used policy), I don't like to be yelled at or made to cry.
Q. Who Dose? (hands in a spread open gesture)
A. Masochists? (head tilted to side with a look of total innocence) Anyway I'm not one, so I don't want to cry. However if someone is not mean I'm fairly laid back about my return policy. I want my customers to be happy, so I'll repair, exchange, or if I have to even return an item. I admit I want to keep the money my customers gave me so I would rather repair or exchange, but I also want them to have warm fuzzes when they think about me so I try my best to achieve that end.
Question 24: Do you like Chocolate?
Answer 24: Yes.
A. Was that the best question you could come up with?
Q. I lost my notes and was stalling for time.
A. Oh for the love of Pete. (sigh)


by Amy Konecny
on March 02, 2015
with 0 comments
I hand-draw most of my charms one at a time. So much work, but the end result is far more interesting. Usually I'll come up with something and Photoshop it then print it out so I can trace it. This makes for a much more consistent product. Which is important when your trying to make matching earrings.
While I was working on a bunch of different panda pictures I got distracted by an idea floating in my head and ended up with the doodle below. I was thinking along the lines of “Look Mom I found something even a Storm Trooper can blow up!”. Don't know if I'll ever use it, but it made me smile hope you enjoy it also.